
Reduca Guides
Functions
Guides to the platform's features
Meeting function - step by step guide
The meeting function consists of 7 steps - from planning to archiving. Below is an overview of each step and what you need to do.
The system autosaves your work on an ongoing basis, so you don't have to worry about losing anything.
Step 1: General
Here you enter basic information about the meeting: meeting name, date, time, description and location (digital or physical).
The system automatically adds all users on the account as suggested attendees - these can be easily edited if needed.
You can also add external participants by manually filling in their details, for example for annual general meetings or supplier meetings.
Upload any meeting attachments that are not linked to specific items (e.g. notice of meeting or annual report).
📎 Annexes belonging to specific agenda items are uploaded in Step 2: Agenda.
Step 2: Agenda
In this step, you create the agenda for the meeting.
The first time you use the feature, you create the agenda from scratch.
After that, you can easily copy an agenda from previous meetings or use your own template.
💡 Tip: To create a template - conduct a meeting and name it for example Board meeting - template. You can then reuse that structure.
When you open an agenda item, you can fill in:
Item number, Title, Duration, Item type, Rapporteur, Description and attach files.
The files are automatically included in the invitation and the minutes.
You can reorder or move files using drag-and-drop or using the arrows - as you move points, the number order is automatically updated.
Step 3: Invitation
Here you prepare and send the invitation to participants by email. The invitation contains:
Name, date, time and place of the meeting
Any notice or instruction
Agenda (automatically attached as PDF)
Annexes attached to the meeting or items
The mailing also includes an RSVP/Attendance check, where participants can accept or decline. This is automatically compiled and displayed later in Step 4: Minutes.
📅 The participant can also add the meeting directly to their external calendar, such as Outlook, Google Calendar or Apple Calendar.
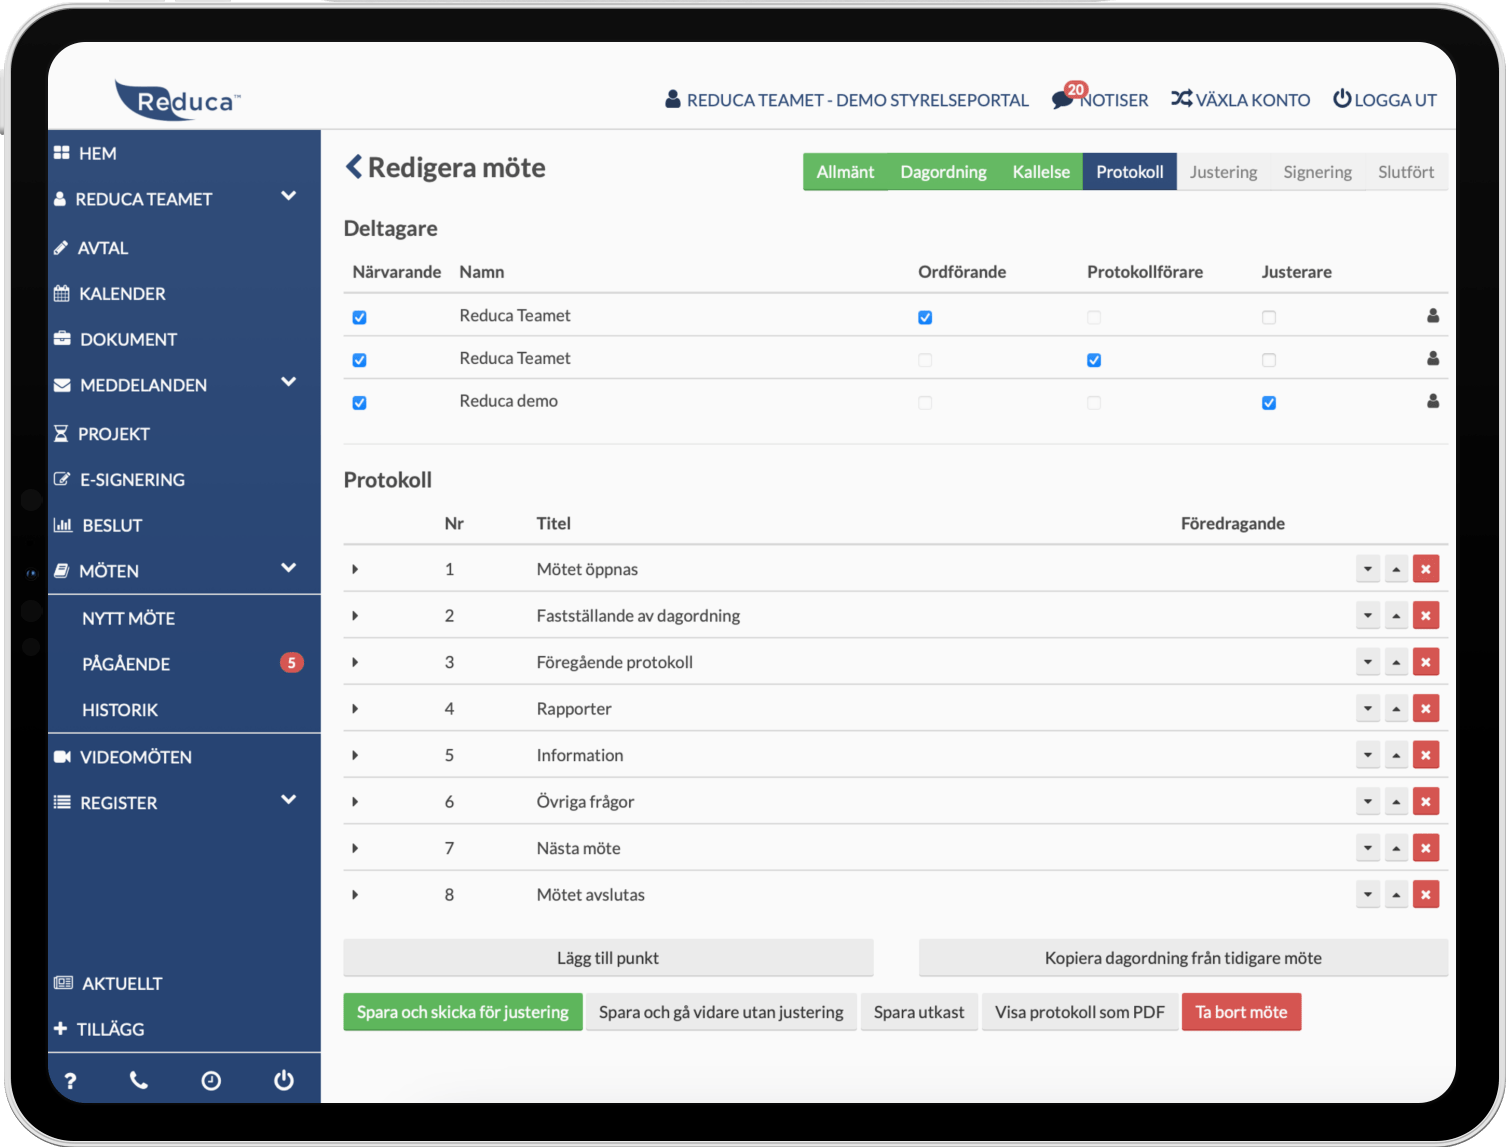
Step 4: Protocol
Here you document the conduct of the meeting.
Start by removing the people who are not present.
Select the chair, minute-taker and verifiers - these are automatically included in the PDF minutes.
Open each agenda item and write down notes, decisions and any changes.
🔎 Items with item type Decision are automatically logged in the Decision Log (under Meetings → Decisions) when the meeting is over - perfect for follow-up!
Once the meeting is over, you can choose:
| Alternative | Purpose |
|---|---|
| Save and send for adjustment | Send the minutes to the chairman and the secretary |
| Save and move on without adjustment | Skipping the moment of adjustment |
| Save draft | Pauses work, you can resume later |
Step 5: Adjustment
The chair and the verifiers receive an email with a direct link to the minutes. There they can:
Approve without amendments
Submit amendments
Withdraw its approval if something needs to be adjusted further
✍️ Tip: The Chair can also make corrections directly in the text of the minutes, not just the minute taker.
The minute taker is then notified of any changes and can update the minutes. Once all the points have been addressed, the minute taker clicks on Approve minutes.
🔔 If necessary, the system can send reminders to adjusting parties.
Step 6: Signing
In this step, the completed protocol is sent for e-signature.
Add the people who will sign (users are automatically suggested).
If BankID is used, the user is required to have a registered social security number (under My Profile) or to enter it manually.
Attachments to be included in the signed document are added under Attachments.
When the signing has started:
Reminders can be sent out
Check the names and social security numbers of all signing parties if you have problems starting the process
Step 7: History
Here you can find a complete overview of all meetings and related documents.
You can easily:
Search meetings by time, year, type or status
See documents, list of participants and decisions
Find previous minutes and annexes
The first view shows the columns:
No. | Type | Name | Date | Participants | Description
How to sign documents digitally via the Board Portal
With e-signing in the Board Portal, you can easily send documents for digital signing – both to internal and external parties. Here's how it works, step by step.
1. Start a new signing process
Click on New e-signature.
Fill in:
Name of the signature (e.g., Minutes of Board Meeting – January)
A message to the recipients (optional)
- The document to be signed – either from your computer or from the document storage in the portal
📎 The document must be in PDF format and may not exceed 10 MB.
2. Add people who need to sign
You can choose from:
Existing users of the Board Portal, or
External parties by manually entering their first name, last name, and email address
If the document is to be signed with BankID, a personal identification number must be registered – either via the user's profile or entered manually at this stage.
💡 Tip: You can add external people without an account in the Board Portal. They can easily sign via the link in the email.
3. Start signing
Once all the information has been entered, click Save and start signing.
The system will then automatically send an email to all parties with:
Link to the document
Instructions for signing
⚠️ Please note: Signing is done via email and not directly in the portal.
4. After signing
Once everyone has signed:
✔ The finished document is automatically saved in the Board Portal
✔ A certificate with a verification number is attached as proof of signing
✔ A copy is automatically sent to all participants in the signing
How to create and conduct a video meeting via the Board Portal
Start by clicking on Create video meeting. Fill in the meeting name, date and time, and a description if you want. Add participants by selecting from the user list or manually entering their details. Once all the information is filled in, click Save to create the meeting.
After the meeting has been saved, you can send out an invitation directly from the Board Portal via email to the participants. A meeting link is automatically generated and can also be shared with external people who do not have an account in the portal.
The meeting starts as soon as at least two participants have joined. During the meeting you can:
Share screen via the Share button. You can choose to share:
A browser tab
A specific window
Your entire screen
Send reactions, such as raising your hand, via the Reactions button.
Chat with other participants by clicking on the Chat button.
💡 Tip!
Open the video meeting in a separate tab by clicking on the meeting link. You can then have one tab with the video meeting and one with the Board Portal, allowing you to navigate around the portal while the meeting is in progress - for example, to view documents, minutes or decision papers.
Keep in mind that meeting consumption is calculated based on the number of participants multiplied by the length of the meeting.
Example: A meeting of 60 minutes with 5 participants counts as 300 minutes.
How to use the Calendar feature
In the calendar, you can now choose between three views: Month, Year, and the new Year Wheel view. The Year Wheel provides a visual overview of the entire year and makes it easy to see recurring activities and important dates in a coherent annual cycle.
To add a planned activity to the annual plan, click on "New activity." Fill in the name of the activity, as well as the start and end dates and start and end times. Once the activity has been created, you can assign responsible persons who will automatically receive reminders via email and text message prior to the activity.
Activities from other parts of the system, such as Agreements, Projects, and Meetings, are automatically added to the calendar. This provides a comprehensive overview of everything that is happening and ensures that important events are always included in the planning.
To create a clear overview, you can use color coding, which makes it easy to distinguish between different types of activities. If you want to make planning even easier, you can set up recurring activities, such as monthly meetings or reporting points, so that they are repeated automatically.
You can also synchronize your annual planning with your private calendar by linking the board calendar to Outlook or Google Calendar via iCal, for example.
How to manage documents and folders in the Board Portal:
To create structure in your document management, start by clicking on "Create folder". This will help you organize your material in a clear and concise way.
To upload files, you can either drag and drop them directly from your computer, or click on "Upload file". For larger amounts of data, use "Upload folder". Please note that the maximum size for a single upload is 500 MB - if the folder is larger it will need to be split into smaller parts.
You can edit the documents you upload directly in the portal. You can rename, delete, preview or password protect them - all in one place. It's also easy to move files between folders using drag-and-drop.
If you want to share documents, you can send them to both internal and external people - and choose to make them available for a limited period of time. If necessary, you can also activate automatic deletion to keep things tidy and avoid leaving old files lying around unnecessarily.
How to upload a new contract in the Board Portal:
To create a new agreement, click on "Add agreement." Start by selecting a category—an agreement template will then appear with the specific information that needs to be filled in. Fill in all the agreement details, attach the original agreement, and any appendices.
In the Reminder section, you can set the applicable time interval. Reminders are then automatically sent via email and text message to the responsible persons, ensuring that important dates are not missed.
When renegotiating, you have the option to add comments, creating a clear history and traceable timeline of the contract. Once the contract is saved, it is automatically extended for the time specified.
For a better overview, you can easily filter between active and terminated agreements – all gathered in one place in the portal. You can also export all agreements by clicking the Export CSV button, which makes it easy to continue working with the information in Excel, for example.
How to create and manage projects in the Board Portal:
To start a project, click on "New project." Fill in the project name, select the status, enter the start and end dates, cost, priority, and estimated time required. Write a description and attach relevant documents related to the project.
Assign responsible people who automatically receive email and SMS reminders for upcoming deadlines. During the project, you can add comments to document important events and create a clear timeline with digital history.
For extra structure, you can also add sub-tasks to the project, which can be easily checked off when they are completed. Each sub-task can have its own responsible persons, reminders, and dates. Reminders are automatically sent to the relevant people, and sub-tasks can also be added to the calendar as activities to provide a comprehensive overview in the annual, monthly, and yearly views.
The Board Portal makes it easy to keep order and structure even in more extensive projects, from start to finish.
How to use the Messages feature
To send messages to external recipients, go to Messages → External. There, you can choose whether the message should be sent via email or text message. You can attach a file, write your message, select recipients—for example, board members, employees, members, or other external contacts—and click Send.
For internal communication between board members, go to Messages → Internal. Here you can create threads that are only visible to logged-in users in the Board Portal. Select recipients, write your message, attach any files, and send. During the conversation, you can edit the participants in the thread, making it easy to add or remove people as needed.
You can also tag people in internal conversations. When a user is tagged in a thread, they automatically receive an email informing them that they have been mentioned, making it easy to bring important information to the attention of the right people.
For a better overview in your inbox, internal threads can be archived when they are no longer relevant. They will no longer appear at the top of the list, and you will no longer receive any reminders linked to that thread.
The system sends automatic reminders to users who have not read their messages in time, ensuring that important information is not missed.
How to create a vote in the Board Portal:
All votes are collected in one place, providing a clear digital history to go back to.
To create a new poll, click on "Create poll". Fill in the title, description, select the poll type, visibility, and start and end dates. You can also choose whether the vote should be anonymous or not.
Add the answer options to be provided and select the people who will vote. When everything is ready, click on "Save and send" to send out the vote.
Once the vote is completed, you can view the results in graphical form and export them as a PDF. If necessary, the vote can also be used as a basis for signing a formal decision.
How to work with records in the Board Portal:
With the Board Portal, you can create structured and clear registers that are adapted to the type of organization you belong to. All organizations have access to both a GDPR register and registers for external contacts. In addition, there may be specific registers such as members, tenants or employees - depending on the needs of the organization.
The registers are integrated with the messaging function, making it easy to communicate directly with individuals or groups. You can export your records in CSV or PDF format at any time.
It is also possible to import records via CSV. For this to work correctly, the file must be saved in CSV format and follow the correct structure. If you are unsure what the structure should look like, you can first export an existing register as a CSV - then you will have a template to start from before the import.
Guides to the platform's settings
Settings
Settings for my profile and our organization
In order to to invite to a new user to the the system, follow the the steps below:
Go to to "Our organization" via the the menu under your name.
Click on the on the button "Invite invite user".
Fill in i:
Name: First and surname
E-mail: Person's e-postal address
(Optional) Add a to a message if you want to send with extra information.
Click on the on "Send invitation".
When you you click on Send invitation will be sent automatically an email to the the recipient with login details and instructions for to get started get started.
NOTE! The first time you log in, use your username and password.
To be able to log in with BankID, you first need to link your social security number to your account:
Go to My Profile via the menu under your name.
Add your social security number in the appropriate box and save.
Once the personal identity number is saved, you can log in with BankID the next time you visit the system.
If you have forgotten your password, click on Forgot password on the login page.
Enter your e-mail address. If you are registered as a user in the system, an email will be sent with a reset link valid for 24 hours.
Follow the link, choose a new password and save.
In the Board Portal, you can control what each user has access to by assigning the appropriate permissions. There are two roles to choose from: Administrator and Observer.
Select permissions when inviting. When you invite a new user, you specify the role that person will have.
Administrator – has full access to all features and can create, edit, and manage content and users.
Observer – has read-only access and access to selected functions for viewing information.
Change permissions retrospectively. Permissions are managed under Our Organization. There, you can edit a user's role at any time and switch between Administrator and Observer as needed.
Remove remove user or leave the the organization
There are two ways for a user to be removed from an organization in the Board Portal:
The user leaves the organization themselves. Go t
Go to My Profile via the menu under your name. Click on Leave the organization and confirm your choice.An administrator deletes a user
Go to Our Organization via the menu under your name. Hover your mouse pointer over the user you want to delete and click the Delete button that appears.
Go to My Profile and enter your mobile number in the Phone field. Then click on Activate under the Two-Factor Login section. A popup will appear - click on "Send code" to receive a confirmation code via SMS.
Once you have received the code, enter it in the field in the popup and click on Verify. Two-factor login is now enabled and will be required for future logins for added security.
Please note that this only applies to logins with username and password - not BankID.
Administrators can reset passwords for other users via Our Organization, which you can find under your name in the menu.
Click Reset password for the current user. An email will be sent to the user with a reset link that is valid for 24 hours.
The user follows the link, chooses a new password and saves.
For increased security, you can choose to require BankID login for the entire organization. This setting is configured under Our organization.
When this feature is activated, all users must identify themselves with BankID when logging in. Users who have not yet registered their personal identification number will automatically be asked to add this the next time they log in, in order to continue using the service.
DEMO
Watch our demo movie
or book a demo.
In just a few minutes, you'll see how you can conduct meetings, share documents and follow up on decisions - all in one portal.
Discover how Reduca saves time, reduces administrative work and gives you full control of your board work.
FAQ
Frequently asked questions and answers
Here are answers to the most frequently asked questions.
Reduca is a digital platform that brings all board-related work together into a single workflow. By consolidating meetings, documents, communications, decisions, and follow-ups into one system, boards and executive teams gain better structure, visibility, and control over their work.
Instead of working across multiple tools—such as email, document folders, and separate meeting systems—everything can be managed directly in Reduca. The platform is designed to simplify planning, improve collaboration, and ensure that important information is always centralized and easy to find.
Reduca includes features that support the entire board’s workflow—from planning and meeting preparation to document management, signing, and follow-up on decisions.
Secure document management
All documents can be securely stored and shared directly within the platform. The board gains a structured and searchable repository for items such as minutes, agendas, reports, and other important documents. Permissions and security features ensure that sensitive information is accessible only to authorized individuals.
Effective Meeting Management
Reduca makes it easy to plan, conduct, and follow up on board meetings. Agendas can be created directly in the system, documents can be attached before the meeting, and minutes are compiled within the same workflow. This streamlines meeting preparations and ensures that all participants have access to the right information at the right time.
Communication and Collaboration
With built-in messaging and discussion threads, the board can communicate directly within the platform. This reduces reliance on email and makes it easier to keep everyone updated on decisions, issues, and ongoing work.
Accessibility and flexibility
Reduca is a cloud-based platform that can be accessed from a computer, tablet, or smartphone. This allows board members to access documents, meetings, and information no matter where they are.
Electronic signing and follow-up on decisions
The platform enables users to digitally sign documents and track board decisions in a structured manner. With a clear record and tracking system, it becomes easier to ensure that decisions are implemented and that responsibilities are clearly assigned.
Why use Reduca?
By consolidating all board-related tasks into a single system, Reduca creates better structure, greater transparency, and reduces administrative work. The board gains a clear overview of documents, meetings, decisions, and tasks—making their work more efficient and sustainable in the long term.
Yes, you can try Reduca for free for 30 days, with no strings attached. There is no automatic renewal after the trial period. If you wish to continue using the portal after the trial period expires, we will send you a contract proposal for your signature. Click here to get started and try it for free.
Our prices are tailored to the type and size of your organization, so you get a solution that fits your needs. For more information on our pricing packages, click on 'Prices' in the menu or follow the link here.
The price is per organization and does not include VAT. For more information about our various pricing packages and how they are tailored to different types of organizations, click here to read more.
Absolutely, we help our customers get started with Reduca at no cost. We offer both training and support for uploading materials to ensure a smooth start. Our goal is to make the transition as easy as possible so that you can quickly take advantage of all the platform’s features.
Yes, support is included at no extra cost. You’ll have access to support via both phone and email, making it easy to get help whenever you need it. Our support team is here to ensure that you get the most out of the platform and that any questions you have are answered quickly and efficiently.
A user is a person who has access to Reduca. Typically, these are board members, but the organization has complete discretion to decide which individuals to invite and grant access to. For example, this may also include external advisors, auditors, or other key personnel who need to access the information on the platform.
The contract term for Reduca is one year, with a three-month notice period. To simplify the process, your contract with Reduca is automatically placed under monitoring, and you will receive regular reminders ahead of the contract renewal. This ensures that you are always fully aware of when it is time to decide whether to renew.
Yes, we have several organizations that use Reduca and have agreed to be featured as customer case studies. Here you can view our customer case studies.
We place a high priority on security so that our customers can feel secure when using Reduca. All data stored in Reduca is encrypted both during transmission and at rest. We perform daily backups of all data to ensure that no information is lost. In addition, Reduca has a comprehensive internal security policy that ensures all employees are well-trained and continuously updated on IT security and best practices for data protection. Please feel free to read more on our security page.
Yes, you can both import and export folders in Reduca. This makes getting started quick and easy, especially when transferring existing documentation. The feature is designed to simplify the management of large volumes of files, saving time and streamlining the transition to a digital work environment.
Yes, you can log in using Mobile BankID. This makes logging in both easy and secure, so you can access the platform safely whenever it’s most convenient for you.
In the meeting template, you can create a detailed agenda with attached documents, send out meeting notices, draft and finalize minutes, and complete the signing process—all directly in Reduca. This feature is designed to make the meeting process as smooth and efficient as possible, saving time and providing better structure for your board meetings.
If you add your logo under the "Our Organization" tab in Reduca, it will automatically be included in both agendas and minutes. This makes it easy to give your documents a consistent and professional look that reflects your organization.
Yes, you can edit both Word and Excel files directly in Reduca, giving you the flexibility to work on documents in real time. You can also create new Word and Excel files directly in the portal, which facilitates collaboration and streamlines your board work.
Yes, you can chat both during video meetings and via internal messages in Reduca. This allows you to communicate effectively with other members in real time, whether you’re in a meeting or need to send quick messages. The feature is designed to facilitate collaboration and create a smoother workflow for all users.
Yes, you can add e-signature processes, editing credits, users, storage, SMS, and participant minutes.
Yes, you can digitally sign documents with external parties who do not have access to Reduca. This allows you to quickly and securely obtain signatures from external stakeholders without them needing to create an account or log in. The feature is designed to facilitate collaboration with external parties and streamline document management.
Yes, you can invite external participants to a video meeting. External participants only have access to the meeting itself and cannot access other features or materials in Reduca. This allows you to collaborate with external parties in a secure and controlled manner.
Yes, you can share your screen and present content during video meetings in Reduca. This feature makes it easy to show documents, presentations, or other important information to meeting participants, making your meetings more interactive and efficient.
You can have up to 200 participants per video meeting.
Contact us for more information
Support
Under the Knowledge tab you will find FAQs, guides and user videos. You can also send an email to support@reduca.se.
Ask your question here
Submit your question here and we will get back to you within 24 hours.